Podcast
Questions and Answers
What must be done with the sealing surface of the supporting flange before positioning the bell-type tank?
What must be done with the sealing surface of the supporting flange before positioning the bell-type tank?
Which of the following tools is required to remove the fixing nuts of the base plate?
Which of the following tools is required to remove the fixing nuts of the base plate?
What should be noted about the o-rings while removing the suction pipe from the on-load tap-changer head?
What should be noted about the o-rings while removing the suction pipe from the on-load tap-changer head?
During the installation process, what is the initial action required before lifting the diverter switch insert?
During the installation process, what is the initial action required before lifting the diverter switch insert?
Signup and view all the answers
How many screws need to be unscrewed from the on-load tap-changer head during the disassembly process?
How many screws need to be unscrewed from the on-load tap-changer head during the disassembly process?
Signup and view all the answers
What is indicated by the red-marked area on the tap position indicator disc?
What is indicated by the red-marked area on the tap position indicator disc?
Signup and view all the answers
What is a critical consideration when lifting off the on-load tap-changer head?
What is a critical consideration when lifting off the on-load tap-changer head?
Signup and view all the answers
Which component must be carefully lifted and withdrawn from the oil compartment during installation?
Which component must be carefully lifted and withdrawn from the oil compartment during installation?
Signup and view all the answers
What is the maximum tightening torque for the nuts securing the on-load tap-changer head?
What is the maximum tightening torque for the nuts securing the on-load tap-changer head?
Signup and view all the answers
Which component should be mounted after ensuring the O-rings are correctly seated?
Which component should be mounted after ensuring the O-rings are correctly seated?
Signup and view all the answers
How many nuts are required to attach the tap position indicator disc properly?
How many nuts are required to attach the tap position indicator disc properly?
Signup and view all the answers
What must be done to the O-rings before installation?
What must be done to the O-rings before installation?
Signup and view all the answers
What is the proper tool size for the screws used to close the on-load tap-changer head?
What is the proper tool size for the screws used to close the on-load tap-changer head?
Signup and view all the answers
What role does the coupling pin play in the installation of the tap position indicator dial?
What role does the coupling pin play in the installation of the tap position indicator dial?
Signup and view all the answers
Which type of washers should be used for securing the head of the on-load tap-changer?
Which type of washers should be used for securing the head of the on-load tap-changer?
Signup and view all the answers
How many screws are used to evenly screw down the on-load tap-changer cover?
How many screws are used to evenly screw down the on-load tap-changer cover?
Signup and view all the answers
What is the purpose of the oil-resistant gasket when mounting the on-load tap-changer head?
What is the purpose of the oil-resistant gasket when mounting the on-load tap-changer head?
Signup and view all the answers
What is the required distance to be maintained between the on-load tap-changer head and the supporting flange?
What is the required distance to be maintained between the on-load tap-changer head and the supporting flange?
Signup and view all the answers
What should be ensured before lifting the on-load tap-changer for installation?
What should be ensured before lifting the on-load tap-changer for installation?
Signup and view all the answers
Why must small parts be monitored when disassembling and reassembling the on-load tap-changer?
Why must small parts be monitored when disassembling and reassembling the on-load tap-changer?
Signup and view all the answers
What is a potential consequence of dropping parts into the diverter switch oil compartment during installation?
What is a potential consequence of dropping parts into the diverter switch oil compartment during installation?
Signup and view all the answers
What should be done with the sealing surfaces before mounting the on-load tap-changer head?
What should be done with the sealing surfaces before mounting the on-load tap-changer head?
Signup and view all the answers
What markings should be noted when positioning the on-load tap-changer head?
What markings should be noted when positioning the on-load tap-changer head?
Signup and view all the answers
Which of the following is NOT recommended during the installation process?
Which of the following is NOT recommended during the installation process?
Signup and view all the answers
What must be ensured in the protective housing of the motor-drive unit?
What must be ensured in the protective housing of the motor-drive unit?
Signup and view all the answers
What procedure should be followed if the protective relay is triggered?
What procedure should be followed if the protective relay is triggered?
Signup and view all the answers
What is a critical action to take after checking the on-load tap-changer?
What is a critical action to take after checking the on-load tap-changer?
Signup and view all the answers
Which of the following is NOT required to be oil-proof?
Which of the following is NOT required to be oil-proof?
Signup and view all the answers
What is the consequence of energizing the transformer without proper checks?
What is the consequence of energizing the transformer without proper checks?
Signup and view all the answers
Which guideline is referenced for checking the protective relay RS 2001?
Which guideline is referenced for checking the protective relay RS 2001?
Signup and view all the answers
What is the audible indication of the diverter switch operation?
What is the audible indication of the diverter switch operation?
Signup and view all the answers
What precaution must be taken regarding the end positions of the change-over selector?
What precaution must be taken regarding the end positions of the change-over selector?
Signup and view all the answers
What is the recommended minimum drying treatment for the on-load tap-changer?
What is the recommended minimum drying treatment for the on-load tap-changer?
Signup and view all the answers
What should be done with the on-load tap-changer cover before vacuum-drying in the autoclave?
What should be done with the on-load tap-changer cover before vacuum-drying in the autoclave?
Signup and view all the answers
During the heating phase of vacuum-drying, how should the temperature be increased?
During the heating phase of vacuum-drying, how should the temperature be increased?
Signup and view all the answers
What is the maximum final temperature for heating the on-load tap-changer?
What is the maximum final temperature for heating the on-load tap-changer?
Signup and view all the answers
What action should be minimized concerning tap-change operations without oil?
What action should be minimized concerning tap-change operations without oil?
Signup and view all the answers
What should be checked after conducting a transformer ratio test?
What should be checked after conducting a transformer ratio test?
Signup and view all the answers
The maximum tightening torque for securing lines to oil compartment connection terminals is 90 Nm.
The maximum tightening torque for securing lines to oil compartment connection terminals is 90 Nm.
Signup and view all the answers
All connections made during the installation process must be carried out carelessly to ensure quick assembly.
All connections made during the installation process must be carried out carelessly to ensure quick assembly.
Signup and view all the answers
Lock nuts M12 require a wrench with a size of 19 to secure the tap selector suspension.
Lock nuts M12 require a wrench with a size of 19 to secure the tap selector suspension.
Signup and view all the answers
The tap selector suspension must be bolted to the oil compartment base after raising the tap selector to its initial height.
The tap selector suspension must be bolted to the oil compartment base after raising the tap selector to its initial height.
Signup and view all the answers
A single locknut and screening cap is adequate for each line attached to the oil compartment connection terminals.
A single locknut and screening cap is adequate for each line attached to the oil compartment connection terminals.
Signup and view all the answers
It is essential to ensure the screening of terminal locations using the screening caps supplied with the equipment.
It is essential to ensure the screening of terminal locations using the screening caps supplied with the equipment.
Signup and view all the answers
The maximum weight of the tap selector during shipment is approximately 500 kg.
The maximum weight of the tap selector during shipment is approximately 500 kg.
Signup and view all the answers
The protective relay RS 2001 weighs approximately 10 kg.
The protective relay RS 2001 weighs approximately 10 kg.
Signup and view all the answers
Diverter switch oil compartment is shipped as one single piece.
Diverter switch oil compartment is shipped as one single piece.
Signup and view all the answers
All on-load tap-changer parts should be removed from their protective wrapping immediately upon arrival.
All on-load tap-changer parts should be removed from their protective wrapping immediately upon arrival.
Signup and view all the answers
The drive shaft with coupling parts and bevel gear has a maximum weight of approximately 30 kg.
The drive shaft with coupling parts and bevel gear has a maximum weight of approximately 30 kg.
Signup and view all the answers
The total weight of the diverter switch head and fitted diverter switch insert is around 210 kg.
The total weight of the diverter switch head and fitted diverter switch insert is around 210 kg.
Signup and view all the answers
Parts must be stored in a humid place until installation.
Parts must be stored in a humid place until installation.
Signup and view all the answers
The shipment should be checked for completeness based on the shipping documents.
The shipment should be checked for completeness based on the shipping documents.
Signup and view all the answers
The end positions of the change-over selector can be overrun during operation.
The end positions of the change-over selector can be overrun during operation.
Signup and view all the answers
A higher torque is required when operating the change-over selector.
A higher torque is required when operating the change-over selector.
Signup and view all the answers
During the vacuum-drying process, the on-load tap-changer cover must remain within the autoclave.
During the vacuum-drying process, the on-load tap-changer cover must remain within the autoclave.
Signup and view all the answers
The maximum heating temperature for the on-load tap-changer is set at 110 °C during the drying process.
The maximum heating temperature for the on-load tap-changer is set at 110 °C during the drying process.
Signup and view all the answers
A minimum number of tap-change operations without oil is recommended.
A minimum number of tap-change operations without oil is recommended.
Signup and view all the answers
The kerosene drain screw should be closed when vapor-phase drying the transformer.
The kerosene drain screw should be closed when vapor-phase drying the transformer.
Signup and view all the answers
Inspecting the connection diagram is unnecessary when checking the attained operating position.
Inspecting the connection diagram is unnecessary when checking the attained operating position.
Signup and view all the answers
The pre-drying stage involves circulating air at a maximum temperature of 10 °C.
The pre-drying stage involves circulating air at a maximum temperature of 10 °C.
Signup and view all the answers
A pipe must be connected to pipe connection S for suction pipe even if no feed pipe is attached.
A pipe must be connected to pipe connection S for suction pipe even if no feed pipe is attached.
Signup and view all the answers
The E2 connection must always be open for connections to the Buchholz relay.
The E2 connection must always be open for connections to the Buchholz relay.
Signup and view all the answers
The serial number of the motor-drive unit must be identical to that of the oil filter unit.
The serial number of the motor-drive unit must be identical to that of the oil filter unit.
Signup and view all the answers
Pipe connection Q is utilized only when there is an oil filter unit connected.
Pipe connection Q is utilized only when there is an oil filter unit connected.
Signup and view all the answers
The adjustment position for the motor-drive unit is indicated in the motor-drive unit's delivery documents.
The adjustment position for the motor-drive unit is indicated in the motor-drive unit's delivery documents.
Signup and view all the answers
If there is no oil filter unit connected, a blank cover is mounted on pipe connection Q.
If there is no oil filter unit connected, a blank cover is mounted on pipe connection Q.
Signup and view all the answers
The mounting instructions for the motor-drive unit are outlined in Operating Instructions no. 138.
The mounting instructions for the motor-drive unit are outlined in Operating Instructions no. 138.
Signup and view all the answers
A collecting pipe for the Buchholz relay cannot be connected to the E2 connection.
A collecting pipe for the Buchholz relay cannot be connected to the E2 connection.
Signup and view all the answers
The protective relay must be connected after 800,000 tap-change operations.
The protective relay must be connected after 800,000 tap-change operations.
Signup and view all the answers
The use of the oil filter unit OF 100 is mandatory for type R on-load tap-changers with Um = 300 kV.
The use of the oil filter unit OF 100 is mandatory for type R on-load tap-changers with Um = 300 kV.
Signup and view all the answers
Transformers are required to filter their switching oil to increase inspection intervals.
Transformers are required to filter their switching oil to increase inspection intervals.
Signup and view all the answers
Operators must monitor the insulating oils in the transformer according to their own discretion.
Operators must monitor the insulating oils in the transformer according to their own discretion.
Signup and view all the answers
The maximum number of tap-change operations recommended before contacting technical service is 1,000,000.
The maximum number of tap-change operations recommended before contacting technical service is 1,000,000.
Signup and view all the answers
If inspections are not conducted by MR personnel, no further reporting is necessary.
If inspections are not conducted by MR personnel, no further reporting is necessary.
Signup and view all the answers
A diverter switch insert should be replaced after 900,000 tap-change operations at the latest.
A diverter switch insert should be replaced after 900,000 tap-change operations at the latest.
Signup and view all the answers
Extending inspection intervals is a risk associated with disregarding inspection guidelines.
Extending inspection intervals is a risk associated with disregarding inspection guidelines.
Signup and view all the answers
Study Notes
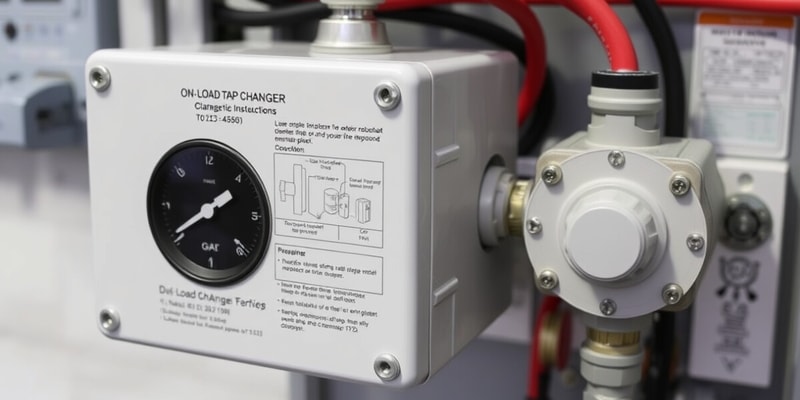
On-Load Tap-Changer Installation
- Red-marked area on the tap changer head is crucial; it isn't covered by the diverter switch insert base plate.
- Fixing nuts of the base plate require removal (4 M8 nuts, wrench 13).
- Carefully extract the diverter switch insert from the oil compartment.
- Disconnect the suction pipe by pulling from the connecting piece in the tap-changer head; be mindful of the O-rings.
- Unscrew the rest of the connections in the tap-changer head (17 M8 nuts, wrench 13).
- Lift the tap-changer head off the supporting flange while ensuring proper sealing.
Attaching the Bell-Type Tank
- Clean the sealing surface of the supporting flange before positioning the bell-type tank.
- Place a gasket on the supporting flange; remove any spacer blocks.
- Lift the tank over the active transformer part and secure it in place.
- Clean sealing surfaces before mounting the tap-changer head, and apply an oil-resistant gasket.
- Ensure alignment using adjusting bolts and markings; maintain a gap of 5-20 mm between the head and flange.
Securing Components
- Raise the tap-changer to align with the fixing holes; avoid dropping parts into the oil compartment to prevent diverter switch blockage.
- Tighten the tap-changer head with 17 M8 nuts (max torque 14 Nm) in the red-marked area.
- Reattach the suction pipe, ensuring O-rings are correctly positioned and slightly greased.
- Reinsert the diverter switch, ensuring proper placement and securing it with 5 M8 nuts.
Final Assembly Steps
- Attach the tap position indicator disc correctly using its coupling pin.
- Close the tap-changer head with a cover, ensuring the rubber gasket is in place.
- Secure the cover with 24 screws (M10, max torque 34 Nm).
- Verify correct operation of the diverter switch; check for audible operation and the ability to reach end positions as per connection diagrams.
Drying Process and Oil Filling
- A drying treatment is mandatory to ensure dielectric properties of the on-load tap-changer.
- For vacuum-drying in an autoclave, remove the tap-changer cover first.
- Heat the tap-changer in air at 10 °C/hr up to a maximum of 110 °C.
- Pre-dry using circulating air; check sealing points, gaskets, and heater functionality.
- If the protective relay triggers, thoroughly inspect the tap-changer and transformer before re-energizing; avoid operating until confirmed undamaged.
Shipment of On-Load Tap-Changer Equipment
- On-load tap-changer and motor-drive unit arrive in adjustment position, packed in two parts: diverter switch and tap selector.
- Diverter switch oil compartment weighs approximately 210 kg.
- Tap selector has an approximate weight of 500 kg.
- Additional components include ED-S (approx. 80 kg) and a drive shaft with coupling parts weighing around 20 kg.
- Protective relay RS 2001 weighs 3.5 kg.
- Confirm shipment completeness using shipping documents; store parts in a dry location.
- Maintain airtight protective wrapping until installation; remove wrapping shortly before installation.
Installation Instructions
- Secure tap selector to the oil compartment base using lock nuts M12 and washers, with a max tightening torque of 65 Nm.
- Connect tap selector leads to diverter switch oil compartment carefully, ensuring secure bolt connections and screening of terminal locations.
- Use coupling parts correctly when bolting tap selector suspension to the oil compartment base.
- Perform a minimum number of tap-change operations without oil; return to adjustment position after transformer ratio tests.
Drying Process and Oil Filling
- Vacuum drying is essential for dielectric properties guarantee; can be conducted alternatively.
- For vacuum-drying in an autoclave, remove tap-changer cover before drying.
- Heat rapidly, increasing by approximately 10 °C/h up to a maximum of 110 °C.
- Pre-dry in circulating air at a controlled maximum temperature.
Pipe Connections
- Connect suction pipe to the designated pipe connection S, ensuring it ends with a drain valve at transformer operating height.
- Use connection Q for oil return from stationary oil filter unit; install blank cover if no filter unit is connected.
- E2 connection is sealed with a blank cover and leads into the transformer oil tank directly below the tap-changer head.
Mounting Motor-Drive Unit
- Follow detailed installation instructions for the motor-drive unit, ensuring serial numbers match with the on-load tap-changer.
- Maintain the same operating position for both motor-drive unit and tap-changer.
- Replace diverter switch insert after approximately 800,000 tap-change operations.
- Recommend use of stationary oil filter unit type OF100 for high operation frequency (15,000 operations/year or more), particularly with specific voltage ratings.
- Importance of monitoring insulating oils per applicable regulations and conducting inspections as necessary, with potential reports for non-MR personnel inspections.
Inspections
- Strict adherence to inspection intervals is critical for the reliable operation of on-load tap-changer and transformer.
Studying That Suits You
Use AI to generate personalized quizzes and flashcards to suit your learning preferences.
Related Documents
Description
This quiz covers the installation of the on-load tap-changer into a bell-type tank. It highlights critical components, such as the tap position indicator disc and the significance of the marked areas. Understand the technical details and best practices for effective installation.