Podcast
Questions and Answers
In the HTH program, what must occur before beginning the course to acknowledge potential risks?
In the HTH program, what must occur before beginning the course to acknowledge potential risks?
- Signing a waiver acknowledging program limitations.
- Acceptance of the instructor's teaching style.
- Completion of a physical fitness assessment.
- Acknowledging and accepting the risk of injury. (correct)
According to the HTH Instructor Course, what is provided to standardize the HTH program?
According to the HTH Instructor Course, what is provided to standardize the HTH program?
- The necessity to learn subjective training in order to improve.
- A strict methodology to follow for each situation.
- A step-by-step guide that illustrates every possible skill nuance.
- A framework that offers an agreed upon objective framework. (correct)
How does the HTH program suggest officers adapt their teaching styles to meet the needs of their officers?
How does the HTH program suggest officers adapt their teaching styles to meet the needs of their officers?
- By delivering instruction per the academy's guidance.
- By adapting teaching styles to satisfy the learning styles among officers. (correct)
- By consistently following the HTH handbook.
- By completing additional training.
According to module two, what determines whether a subject is classified as resistant?
According to module two, what determines whether a subject is classified as resistant?
Which of the following options is an accurate explanation of the 'relative positioning' concept?
Which of the following options is an accurate explanation of the 'relative positioning' concept?
Flashcards
Strong Hand
Strong Hand
Is the hand that would hold your baton or firearm.
Strong Side
Strong Side
The side where your strong hand and strong foot are located.
Loading/Backloading
Loading/Backloading
Positioning the ratchet blade so the ratchet must only go through 2 or 3 teeth instead of 15 or 20.
Double Lock
Double Lock
Signup and view all the flashcards
Resistant Cuffing
Resistant Cuffing
Signup and view all the flashcards
Study Notes
- The HIATT Tactical Handcuffing (HTH) course program is provided by the Safariland Training Group.
Other Courses Offered by Safariland
- Emergency Response to an Armed Intruder trains personnel on initial actions to take in the first 3-4 minutes of an intruder event.
- Basic Tactical Shield Instructor teaches all techniques and drills to train personnel on ballistic shield use.
- Ron McCarthy’s Command Leadership teaches supervisors and incident commanders basics to make decisions during major incidents.
- Crowd Management addresses agencies managing crowd control during riots with classroom and practical training for all ranks.
- C.E.R.T. Correctional Emergency Response Team (Basic Instructor Course) trains operators to handle dangerous inmates.
- Tactical Breaching provides tools and tactics for operators to make forced entry.
- Shoot-House Instructor offers a curriculum for personnel to implement live fire instructional programs.
- Patrol Rifle emphasizes modern patrol rifle applications for rapid, accurate, and effective responses.
- Patrol Bike is an advanced class for bike patrol officers to increase their handling skills and teach offensive and defensive tactics.
- Female Officer Survival is an advanced class for bike patrol officers to increase their handling skills and teach offensive and defensive tactics.
- More information can be found at www.safariland.com/training.
- Safariland Training Group STG programs are for educational and knowledge enhancement purposes.
- STG is designed for law enforcement, corrections, military, and licensed security personnel.
- Development and implementation of agencies operating procedures are the sole responsibility of that agency.
- Safariland isn't responsible for equipping or the use of their products in the course/scope of the officer's duties.
- Safariland doesn't authorize personnel to act on its behalf.
- A certificate of completion doesn't authorize a user to act as an agent or representative of Safariland.
- STG courseware is subject to change without prior notice.
- Safariland doesn't authorize reproduction or use of its trademarks by other agencies.
- It is impossible to predict every circumstance that might arise in training with an officer.
- Each officer must consider their experience, abilities, responsibilities, policies and legal obligations.
- Agencies and officers have to evaluate the training and techniques contained in STG courseware.
- Safariland doesn't guarantee the STG courseware and disclaims any implied warranties.
- Training areas should be free structural hazards so people can train safely.
- Accident-free training and building psychomotor confidence are the objectives of hands-on training.
- Participating in the course assumes associated risks and responsibilities.
- The training intensity will likely be static rather than dynamic or street simulations.
HIATT Commentary
- The HTH program is a psychomotor skill-based curriculum that builds officer confidence through lectures and hands-on practice.
- The HTH Instructor Course covers self-defense and Subject-control which trainers can use.
- Lesson plans provide a framework for standardizing handcuffing at all levels.
- Every subtle skill nuance or stylistic interpretation can't necessarily be explained through the HTH handbook or lesson plan.
- There is an objective framework to standardize HTH instruction and testing.
HTH Basic Course
- No two trainers or officers are the same.
- HTH handbook and lesson plans provides instruction that can be consistently useful.
- Minimum acceptable performance standard (MAPS) must be met for each skill.
- Agency trainers should use methodologies that bring HTH skill to life as a street tactic.
- Portions of this presentation can be reproduced in any form by active public and private law enforcement as HTH Instructors.
- Officers in the HTH Basic Course, or certified instructors have STG's permission to photocopy all portions of this presentation.
- Injury risk in HTH is a concern, and training areas need to be free of hazards.
- Static training intensity is endorsed by MPTC to build confidence within a student.
- Agency Trainers with an HTH Instructor diploma are NOT agents or employees of STG.
Module One
- Acknowledges that the HTH Instructor Program includes key elements of MDTS Handcuffing Modules, POST-Approved State Lesson Plans, and is aligned with the Best Practices and Principles.
- HTH increases greater officer safety / survival confidence, and maintains professionalism in the face of a subject.
Basic Course Information
- Officers learn to execute basic performance principles for skills in the HTH Basic Course.
- The HTH Instructor Course is 8 hours, and the HTH Basic Course is 4 hours.
- Criminal Justice Agency's Senior Management determines when Basic/refresher courses are conducted.
- After a trainer demonstrates an HTH skill, officers will perform it to Minimum Acceptable Performance Standard (MAPS).
- During the course, officers may pair up as partners, and rotate the role of officer and coach, or officer and non-compliant subject.
- Agency trainers provide officers safety instructions, and demonstrate them.
- The training intensity is established to ensure proper learning and a safe training environment.
- Demonstrating or performing HTH techniques require caution is needed to minimize the risk of injury.
- Common sense, such as using padded mats for prone handcuffing, should be taken to ensure course safety.
- Minimum competency is required in all HTH skills via skills MAPS with written test.
- Completion leads to an HTH Basic Course diploma, and possible refresher course is required at direction of Senior Management.
Course Objectives
- Help Criminal Justice CJ personnel understand the use of force as it pertains to handcuffing principles / techniques
- To teach CJ personnel the nomenclature and components of handcuffs, then to teach techniques that enable CJ personnel to control complaint and non-complaint subjects
- The use of techniques that teach CJ personnel how to minimize potential injury by using the correct techniques.
Performance Objectives
- To teach personnel the six components of handcuffing.
- Explain his/her department's policy with regards to Use of Force and demonstrate MAPS of HTH handcuffing techniques.
- Cover searching as part of the arrest procedure as well as review the overall control and transport.
Use of Force
- It is essential to provide students with guidelines for using force in an operational setting. Officers should be made aware of agency or departmental and when not to use physical force including firearms, OC, or a baton.
- In the United States, use of force is covered under the federal US code 42 section 1983, as well as applicable court decisions.
- Having a competent legal representative is paramount and will allow agencies the abilities to reduce problems.
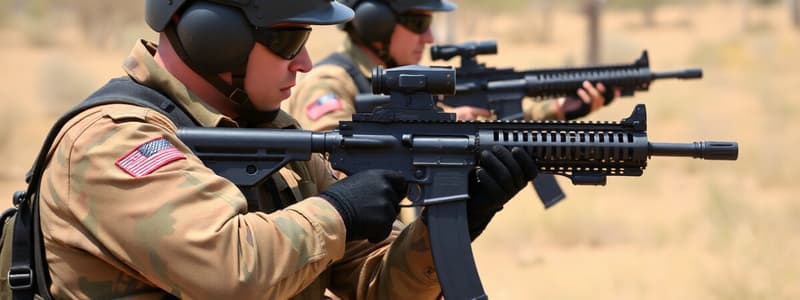
Points of the Human Body
- When making an arrest, an officer will face a suspect who is a Resistant Subject (Passive or Active).
- A subject's behavior will determine basic skills to control a Resistant or Assaultive Subject so the arrest can occur.
- Defensive tactics and countermeasures are found in the MDTS Program.
Key Definitions
-
Strong Hand refers to Officer’s Dominant Hand and it is the hand that would hold your baton or firearm.
-
Strong Side is the side where the strong hand and Strong Foot are located.
-
Support Hand is your LESS-Dominant Hand and it is the hand opposite your strong hand.
-
Support Side is the side where your support hand and Support Foot are located.
-
An agency has the power to substitute other terms to identify Officer’s hands, feet or body sides for standardization.
Additional Definitions
- Double Lock: Technique which renders restraints from tightening further on the Subjec's wrist.
- Compliant Cuffing: A Subject is passive and compliant in nature, who isn't resisting.
- Resistant Cuffing: The Subject is activity resisting, and you must use the aggressive handcuffing technique.
- Loading/Backloading Handcuffs: Position of the ratchet blade so when handcuffs are applied, the ratchet must only go through 2 or 3 teeth instead of 15 or 20.
- Gripping: Manner in which the officer hold the chain/hinge handcuffs.
- Relative Positioning: A numbering system used by the Officer for body placement.
Important Definition
- Finger Test is the ensuring handcuffs are not overtightened by inserting a fingertip between wrist and handcuffs.
Module 3 Topics
- Balance, Basic Stance, Patterns of Movement as well as, Relative Positioning
Balance
- Balance is key in activity performed, and without it, you WILL NOT be successful in that activity.
- Balance refers to finding your center of gravity while you move.
Basic Stance
- Balance must be maintained whether in HTH skill or when performing a tactical situation.
- Your Support Side should be turned slightly toward the Subject.
- Your feet should be about shoulder width apart.
- Your knees should be slightly bent, and the weight of your body evenly distributed on both legs.
- Your head and neck should also be held erect.
- Your Strong Side should be turned away from the Subject (to shield firearm).
Tactical Tip and Definition
- Your survival gap of 4 to 6 feet should between the Subject and you to have reaction time to react to danger.
Defensive Stance
Assume Basic Stance [with a lower center of gravity] with the Strong and Support Hands up at chest.
Patterns of Movement
- Shuffle, Pivot, Sidestep and Diagonal are your Patterns of Movement that allow you to move in 8 total directions
- Think of Patterns of Movement as SURVIVAL DANCING
Forms of Shuffle
-
Forward Shuffle – is performed quickly by sliding your support foot forward from the stance position.
-
As your momentum moves forward, slide your strong foot forward to reestablish your stance.
-
Rear Shuffle – is performed by quickly sliding your strong foot back from the stance position, with the same process.
Forms of Pivot
-
Forward Pivot – is performed by quickly turning on the ball of your support foot, while rapidly sweeping your strong foot forward.
-
As your momentum rotates forward, determine where and when you are going to stop your forward pivot, and then reestablish your stance.
-
As your momentum rotates back, you will have to determine where and when you are going to stop your rear pivot, and then reestablish your stance.
Forms of Sidestep
- Strong Sidestep – is performed by quickly sliding your strong foot out [laterally] to your strong side, and support foot moves over
- Support Sidestep – is performed by quickly sliding your support foot out [laterally] to your support side, and strong foot moves over to reestablish.
Forms of Diagonal
- Forward Diagonal – is performed by quickly sliding your support foot forward and at a 45° angle.
- As your momentum moves diagonally forward, bring your strong foot forward as you blade your body toward your attacker and reestablish your basic stance.
- Rear Diagonal – is performed by quickly sliding your strong foot back and at a 45° angle.
- As your momentum moves diagonally back, bring your support foot back as you blade your body toward your attacker and reestablish your basic stance.
Relative Positioning - Fundamental Rules-As an Officer
-
AVOID the INSIDE POSITION when approaching a Subject from the front.
-
Use the angles of Position 1 when approaching a Subject from the front.
-
Use the angles of Position 1 WHENEVER YOU STAND IN FRONT of a Subject, remember to AVOID the INSIDE POSITION.
-
Move to Position 2½ to gain the POSITION OF ADVANTAGE when attempting a Subject-control hold from any approach.
-
Be aware of a Subject’s ability to powerfully move at 90° angles when YOU are at either Position 2 or 3.
Six Components of Proper Handcuffing
- The Six Components of Proper Handcuffing are important elements to ensure that a handcuffing technique will be performed completely and safely.
- The Six Components are vital elements in ALL handcuffing techniques that MUST be completed to ensure Officer/Subject safety.
Step 1 - Immobilize
Subject is placed in a position where his/her balance and movement is impaired.
- This may be done in a Standing, Kneeling, or Prone position.
- Subject is placed off-balance, while the Officer maintains a solid, well-balanced position.
- The Officer will also assume the most tactical position available regarding relative positions.
Step 2 - Control
Once a Subject isImmobilized, the Officer will gain control of the Subject’s wrist, arm and/or shoulder depending on the level of control needed.
- This control may be established by a use of Control Techniques from the MDTS program.
Step 3 - Handcuff
Once control is established, then the officer will handcuff the subject with techniques used that will be determined by Immobilization with use of control
- The subject should always be handcuffed with their hands behind the back-Unless exigent stances are present.
- Handcuffs should we tightened, fingertip level then double locked whenever you are tactically doing it.
Step 4 - Search
Officers ALWAYS need to be aware of safety while conducting ANY search of a subject thoroughly. This search should be conducted systematically to guarantee no weapons are left with high certainty on their body. Officer needs to be aware of techniques used during the search and of what side of the person to do it on.
Step 5 - Monitor
An Officer must be able to identify any injuries that they're sustained over a subject or prior to coming in contact.
- The officers are respoisible to provide medical care but to continue to monitor the project to ensure our safety/being.
- Officers must know about all situations to place a subject at high risk and there are the medical complications, etc.
Step 6 - Transport
In order to move the subject they should be in to the one of appropriate Prisoner Transport Stations after this has to happen by establishing and maintaining control type of prisoner transport determined by resistance that is met.
- The officer is responsible for the subject to maintain what happens that and you have to maintain control of The Subject to maintain control of these level of resistance encountered or not..
- The officer is advised to be aware of policy and STATE law.
Compliant Handcuffing Technique
Officers advise Subjects who are compliant to spread their feet, point toes, and hands on back. Techniques break steps for strong Side approach but there are same side steps for a support type.
Compliant Handcuffing
- Position Subject with voice commands, with Officer gains position of advantage with the best side.
- Has proper position of advantage and with verbal command and that involves: feet and toes out and back up and then positioning outside.
• Have thumb windex finger and chain taught/ secure bottom while up then shift Shuffle steps within reach to reach and grab from back while grabbed.
Compliant Technique Continued.
Fingers grip around blade of subject and hold thumb up officer places their hand holding. With hand curve heel and and small fingers we are placing over subject wrist that's between breast bone. The next step is to push bottom of Handcuff to so single strand Spines are connects with double stranged.. Now one strand is reconnected, and you grab for their hand/ obtain reverse. handshake with position of palm acroses. Have handshake where officer now places top hand cuff with a single strand lo then push against to connect for top/ bottom strand.
Both are tied, tightened/lock then the subject is searched to then bring it them to prisoner station/ position for the situation and events.
Follow-Up Phase for Compliant Subject Standing Handcuffing Position.
Your Department policies and procedures/General Orders should guide how you handcuff a Subject. Here, generally the following points may be helpful to you when conducting a search incident to an arrest.
Tell the subject to stand still will conduct a head to toes each by holding Subject via the non searching hand.
• After search is done just take the subject over to the designated treatment.
Non-Compliant HandCuffing Steps
If you have this case officers actions have led the officer perceive here she's non compliant, and there's perception due to there actions. The hand should also allow you to control the suspect then place control techniques to be used/ done
Steps for strong approach include:
Non Compliant Position and Technique
-
This hand is being put to support side then can apply steps from opposite, because Officer is at rear wrist lock position due to crime.
-
Subject has solid support to help be situated by wall cruser for whatever is happening and is advised to not lean (NO LEAN!).
-
Is position with feet facing and toes outward and hand takes what is there by other side and open handcuffs.
-
the hands are then taken out and one cuff is slided for it to be over then locked in Then one or the other hand let's goo to grab other to put in same spot and there's strong security there.
-
Then you know that's then grabbed for that place and and make that occur.
-
The you need the hand to be in position because is held, to complete this.
Follow up
- Your department policy should be followed to ensure safety then what comes after.
- Officer needs to now act according the way the hand and cuff will affect their actions then follow their procedure.
- Tell suspect to be still and switch when searching, and after take to processing/ center.
Arms Bar Takedown
Used when Officer perceives level is to a point where not safe to cuff when standing but use for high resistant suspects. To take down, use one one or more takedowns, in order prone ground then secure. There steps in strong side approach but that, also steps are for support
Prone HandCuffing.
- Suspect Taken Using The Arm bar
- Arm is away from Body Thumb is sent to enter while fingers center/Palm with hand then this wrists bent so its secure before movement to the head The knee to shoulder is placed by officer because officer bands
-
- Many jurisdiction prohibit a knee to shoulder**
- Hold with control.
This leads to the havd release from hip take handcuffs then officer puts in the band while gripping and then secure when ready. If not there is the maintenance/bent-wrist when is completed and there is check of cuffs/searched with the proper steps.
Follow up phase
- Department policy needed to ensure it or just any other such to help the suspect. Side rest is key.
Upper Quadrant Technique
-
Jurisdictions ban knees on back.
-
Can create Upper Quadrant by following the numbered list of the body with these steps
- Leg to knee 2 knee to upper thigh 3 upper that to small 4 small to upper head, in a V form..
- This help allow low center.
Getting subject from the ground
- Subject is one sidw where officer takes behind and grabs for support or prisoner hold to help put him as assist. To lift the officer may push the solder until standing with prisoners position being in take.
Takedown to Prone
- Officer believes level is at that point there -Officer has high need of being on is and high perceptions and for safety, use principles that Patrol and the subject goes to point to be on floor.
- Officer then, take and cuff the prisoner per standard proceed.
If that not possible perform support Side instead
Compliant to the none
- Where subject becomes is high level, there should be start high and there needs to be, for one point after and for the hand.
- It can then become that officer will and is able to switch per step that must have
Verbal
Officer with control then it must's be completed following other steps
- then subject search.
General Follow ups
From kneeling, start back then get “opposite“ Elbo to go side for chest. with pocket access
Verbal - Comannd
And those command is needed will the person be. with also the process from there
- Follow arm and to head or bent because it is so and then do it..
Follow up must to to take the Suspect
If any, quickly act and disengage.
- Your Department policy is need.
To be help for
1 is Stand still at 2- Hold The Supecct
More steps can be helpful
When you get ready or and then then you're transported.
13 - The next and follow.
- If suspect corporate, officers say what take and take to, but that person try damage so react properly.
- Then just follow steps from other one (repeat)
All of above can to be follow by officers as their actions dictate for good safety.
Double Locking handcuffs
Important is that, it used by many agencies when activate. Then when key that will not allow adjustment to do anything. The officer can't take time may have double look but he to get the subject into control once done. Officer and a part what double look is you want to just understand the nomenclature, how they do to help secure any chance.
An easy area is helpful because a key could help you double lock that is why and the double lock is a important that.
Search Time
- It is always one a suspect is in custody but, has be done guarantee there is zero weapons within proximity and in and around in the area.
- With the search, follow body for this as one quarter at certain time and step and do it very very good while on area.
( It should be known because should is a “ pat down” if it not that
- Also know there may be things (crime).*
To make all above well
Follow “ The seize“ to cloth then from bottom do it.. and put on gloves. It needed.
- And can be seen every one should be in Police Custody.
Prisoners
- With such can be taken it and, and it now must to is in place it it is well need but there.
- You can place it on position to and from it it must to is very you know need is what is with inside officer needs to work with him in is a in place.
With above technique
Can now follow there position.. and control the part of it.
And such a subject level there are different action be is with.
- Here is for steps to to follow in this in
(1) You got the hands and two hold the body (like this) These are all needed and is can very good to assist. With the help these techniques
17 module ( safety!)
- Important.. * Subject does try cause one thing this is why is why do not have one..
And do must do.. A. You had control safety. B. You not sure then, it a no now
You need them as under do.. and what is what I put on and and the place that side I to make I will keep them at safe to is not that the.
If officer is at all is and and doing not one then the is needed
- You get what need to is this
- Make sure key safe
3 Do step by step..
Important. *
- Do what it to a 1/2 then you know have can so it help. *
Instructor Development
- Types of learners (told, see, do).
- Teach for least trained and use of of lecture.
- Also use safety is the code because EDIP is built can and enhance the progress it that so can continue to help develop to what it.
Contact us!! Is at 1/80/347/2300
- Is has staff with names is contact emails.
Studying That Suits You
Use AI to generate personalized quizzes and flashcards to suit your learning preferences.