Podcast
Questions and Answers
What is the primary purpose of using a rhino pounder in installing a vinyl privacy fence?
What is the primary purpose of using a rhino pounder in installing a vinyl privacy fence?
- To measure and mark the spot for the screws
- To hang the gate on the high side of the land
- To mix and pour concrete into the post holes
- To drive posts into the ground without digging (correct)
What is the purpose of the 'donut' adapter in the fence installation?
What is the purpose of the 'donut' adapter in the fence installation?
- To mark the spot for the screws
- To secure the top rail in place
- To adapt the vinyl post to the metal post (correct)
- To attach the cap to the fence
Why is the hinge post taller than the other posts?
Why is the hinge post taller than the other posts?
- To ensure proper drainage
- To secure the fence to the ground
- To allow for the gate to hang (correct)
- To hang the gate on the high side of the land
How are the rails secured in place?
How are the rails secured in place?
What is the purpose of using a U-channel in the fence installation?
What is the purpose of using a U-channel in the fence installation?
Why is the gate hung on the low side of the land?
Why is the gate hung on the low side of the land?
What is the purpose of using glue in the fence installation?
What is the purpose of using glue in the fence installation?
What is the main difference between this method and the traditional method of installing a vinyl privacy fence?
What is the main difference between this method and the traditional method of installing a vinyl privacy fence?
The hinge post is on the high side of the land to ensure water drains away from the house.
The hinge post is on the high side of the land to ensure water drains away from the house.
The posts are all different sizes to accommodate the gate.
The posts are all different sizes to accommodate the gate.
The vinyl post is slid over the metal post without an adapter.
The vinyl post is slid over the metal post without an adapter.
The rail is locked in by the vinyl posts and cannot come out.
The rail is locked in by the vinyl posts and cannot come out.
The cap is attached to the fence using a screw.
The cap is attached to the fence using a screw.
The fence is built with the gate on the high side of the land.
The fence is built with the gate on the high side of the land.
The 'donut' adapter is used to attach the rail to the post.
The 'donut' adapter is used to attach the rail to the post.
The traditional method of installing a vinyl fence involves driving posts into the ground using a rhino pounder.
The traditional method of installing a vinyl fence involves driving posts into the ground using a rhino pounder.
Match the following components with their descriptions in installing a vinyl privacy fence:
Match the following components with their descriptions in installing a vinyl privacy fence:
Match the following steps with their purposes in installing a vinyl privacy fence:
Match the following steps with their purposes in installing a vinyl privacy fence:
Match the following components with their purposes in installing a vinyl privacy fence:
Match the following components with their purposes in installing a vinyl privacy fence:
Match the following tools with their uses in installing a vinyl privacy fence:
Match the following tools with their uses in installing a vinyl privacy fence:
Match the following steps with their characteristics in installing a vinyl privacy fence:
Match the following steps with their characteristics in installing a vinyl privacy fence:
Match the following components with their installation methods in installing a vinyl privacy fence:
Match the following components with their installation methods in installing a vinyl privacy fence:
Match the following components with their characteristics in installing a vinyl privacy fence:
Match the following components with their characteristics in installing a vinyl privacy fence:
Match the following steps with their purposes in installing a vinyl privacy fence:
Match the following steps with their purposes in installing a vinyl privacy fence:
Flashcards are hidden until you start studying
Study Notes
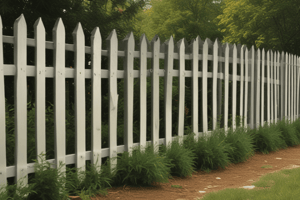
Installing a Vinyl Privacy Fence
- The fence is being installed at a beautiful home using a different method than traditional digging and filling with concrete.
- The method involves driving posts into the ground using a rhino pounder.
Posts and Adapters
- The posts are 2 3/8 SS40, 6 feet long, with 3 feet in the ground and 3 feet above.
- The posts are all the same size, and the line should be continually straight.
- The hinge post is taller (8 feet) to allow for the gate to hang.
Gate and Hinge
- The hinge post is on the low side of the land to ensure water drains away from the house.
- The gate will be hung on the low side to ensure proper drainage.
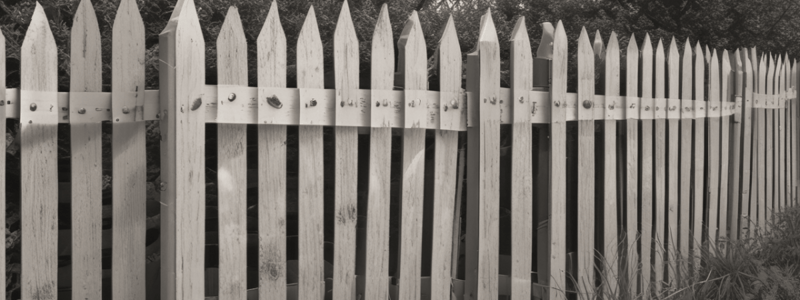
Rails and Donuts
- The vinyl post is slid over a "donut" (2 3/8 by 5/8 post adapter) and into the vital post.
- The donut allows the vinyl post to adapt to the vital post.
- The rails are inserted into the posts, and the fence is built from there.
Measuring and Installing Rails
- Measure from metal post to metal post to ensure the rail sits tight.
- Lift the post and rotate it to get the rail in place.
- The rail is locked in by the two posts and cannot come out.
Setting Height and Securing Posts
- Set the height of the fence by screwing the post into the donut.
- Use a U-channel to mark the spot for the screw.
- Drill into the post and donut to secure the post.
Building a Section of Vinyl Fence
- Measure and rip the pickets to the correct width.
- Install the pickets between the posts, ensuring they are pulled tight against each other.
- Insert the top rail, which has already been pre-cut.
- Use rail locks to secure the top rail in place.
Finishing the Fence
- Use glue to attach the cap to the fence.
- Use a small amount of glue, similar to wrapping a Christmas present.
- Tap the cap into place to ensure it's level and secure.
Comparing Methods
- This method is compared to the traditional method of digging and filling with concrete.
- The equipment needed for this method is less than the traditional method.
- This method is safer for landscapes and has limited job access.
- The speed of install is debatable, but the structural integrity is the same as the traditional method.
- The cost of this method is comparable to the traditional method.
- Repairs are easier with this method, as it only requires undoing a few sections and replacing the post.
- However, this method is not suitable for rocky ground conditions.
Installing a Vinyl Privacy Fence
- Fence installation uses a method that doesn't require traditional digging and filling with concrete.
- This method involves driving posts into the ground using a rhino pounder.
Posts and Adapters
- Posts are 2 3/8 SS40, 6 feet long, with 3 feet in the ground and 3 feet above.
- All posts are the same size, ensuring a straight line.
- The hinge post is taller (8 feet) to accommodate the gate.
Gate and Hinge
- The hinge post is positioned on the low side of the land to allow water to drain away from the house.
- The gate is hung on the low side to ensure proper drainage.
Rails and Donuts
- A vinyl post is slid over a "donut" (2 3/8 by 5/8 post adapter) and into the vital post.
- The donut allows the vinyl post to adapt to the vital post.
Measuring and Installing Rails
- Measure from metal post to metal post to ensure the rail sits tightly.
- Lift the post and rotate it to get the rail in place.
- The rail is locked in by the two posts and cannot come out.
Setting Height and Securing Posts
- Set the fence height by screwing the post into the donut.
- Use a U-channel to mark the spot for the screw.
- Drill into the post and donut to secure the post.
Building a Section of Vinyl Fence
- Measure and rip pickets to the correct width.
- Install pickets between posts, ensuring they are pulled tight against each other.
- Insert the pre-cut top rail.
- Use rail locks to secure the top rail in place.
Finishing the Fence
- Attach the cap to the fence using a small amount of glue.
- Tap the cap into place to ensure it's level and secure.
Comparing Methods
- This method is safer for landscapes and has limited job access compared to traditional digging and filling with concrete.
- The equipment needed is less than the traditional method.
- This method has comparable cost and structural integrity to the traditional method.
- Repairs are easier with this method, as it only requires undoing a few sections and replacing the post.
- However, this method is not suitable for rocky ground conditions.
Building a Vinyl Privacy Fence on a Hill
- To replicate the terrain, set one post taller than the other.
- Each post should be out of the ground roughly the same amount to ensure it follows the terrain when going up an incline.
Finding the Angle
- Measure from the 1 1/4 inch mark on the post to the bottom of the rail to find the angle.
- Calculate the overall length by measuring from the face of the metal post to the face of the metal post on the receiving side.
- For a no dig system, measure from the bottom of the hole to the metal post; for a traditional system, add 3 inches to the overall length.
Cutting the Rail
- Mark the rail at the measured length and draw a line to connect the marks.
- Cut the rail at a 10-degree angle using a saw.
- Ensure the rail is cut correctly, as it can only be installed one way.
Installing the Pickets
- Cut the pickets at a 10-degree angle to match the slope, taking half the angle off the top and bottom.
- Find the center of the picket and cut at a 10-degree angle for a perfect fit.
Installing the U Channel
- Use Phillips pan head self-tapping screws to attach the U channel to the post.
- These screws help to go through the vinyl quickly and prevent the screw from walking.
Tips and Reminders
- Be prepared to use a router to widen the hole if it becomes too tight when dealing with angles and inclines.
- Ensure the pickets are not too short and cannot be pushed out of the rail.
- A single picket failure can cause the entire section of vinyl fence to blow out.
Studying That Suits You
Use AI to generate personalized quizzes and flashcards to suit your learning preferences.